
WavesAI Studio – Complete Feature Guide
Everything you need to know about your AI creative platform
Table of Contents

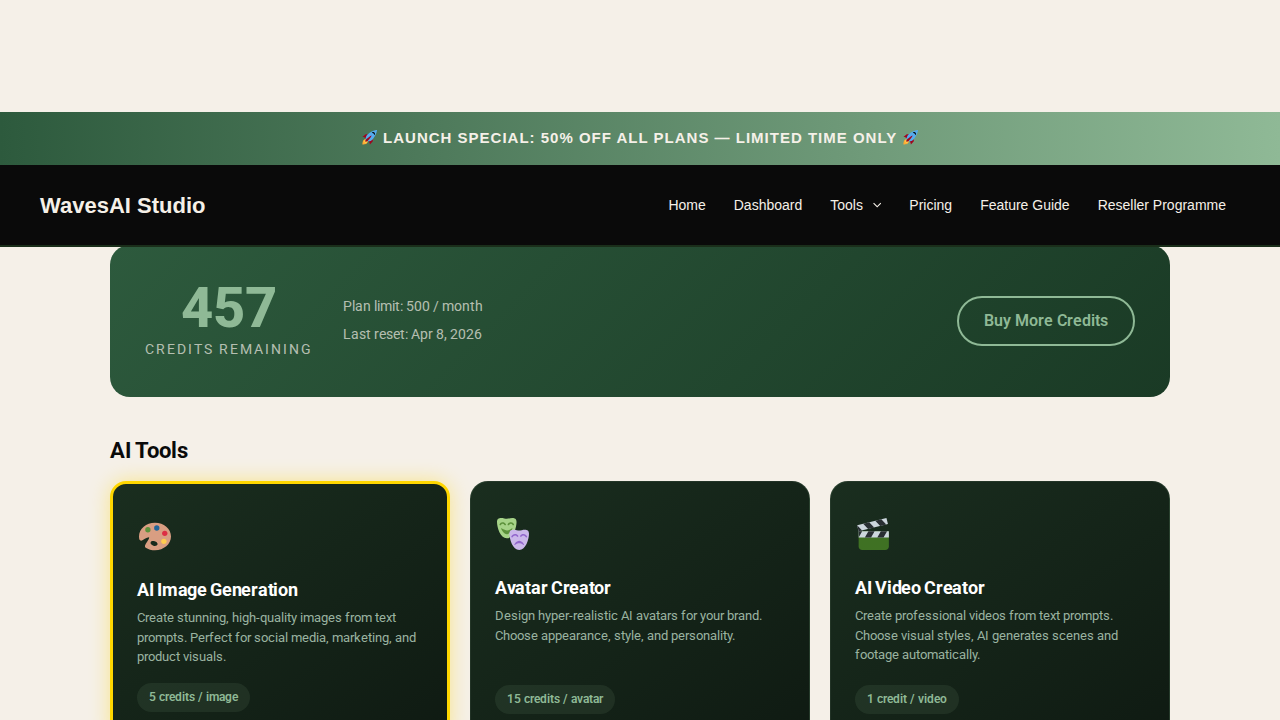
1. AI Image Generator
Create Stunning Images From Text Descriptions
The AI Image Generator creates professional-quality images from text descriptions. Simply type what you want to see and the AI generates it in seconds. Supports multiple sizes and generates up to 4 images at once.
In this guide, we’ll walk you through creating an image step by step.
Step 1: Open the AI Image Generator
From your dashboard, find the “AI Image Generation” card and click on it. You can also access it from the Tools menu in the navigation bar.
Step 2: Describe Your Image
You’ll see the image creation interface with three steps: Describe Your Image, Choose Settings, and Generate & Download.
Type your image description into the prompt field. Be specific about what you want – include details about the subject, style, lighting, and composition. Here’s a prompt you can try:
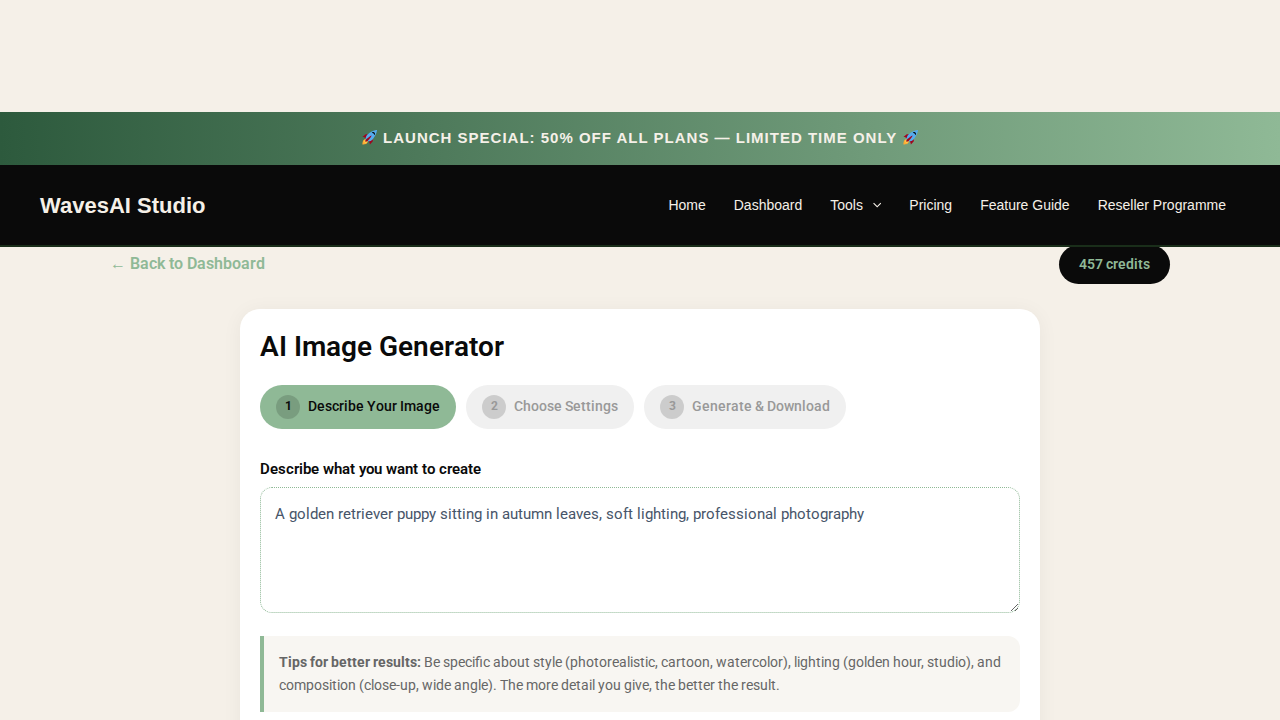
The tips below the prompt area suggest including: style (photorealistic, cartoon, watercolour), lighting (golden hour, studio), and composition (close-up, wide angle). The more detail you give, the better the result.
Once you’ve written your prompt, click “Next: Choose Settings” to move to the next step.
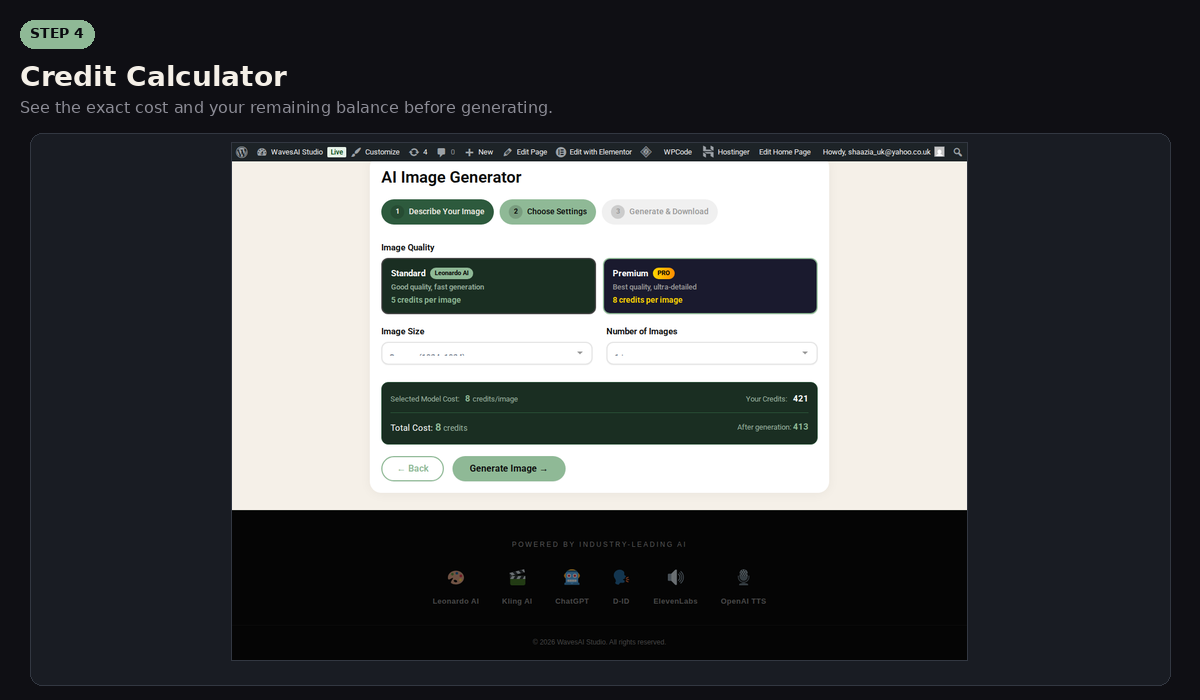
Step 3: Choose Settings
Now you’ll configure two settings for your image generation:
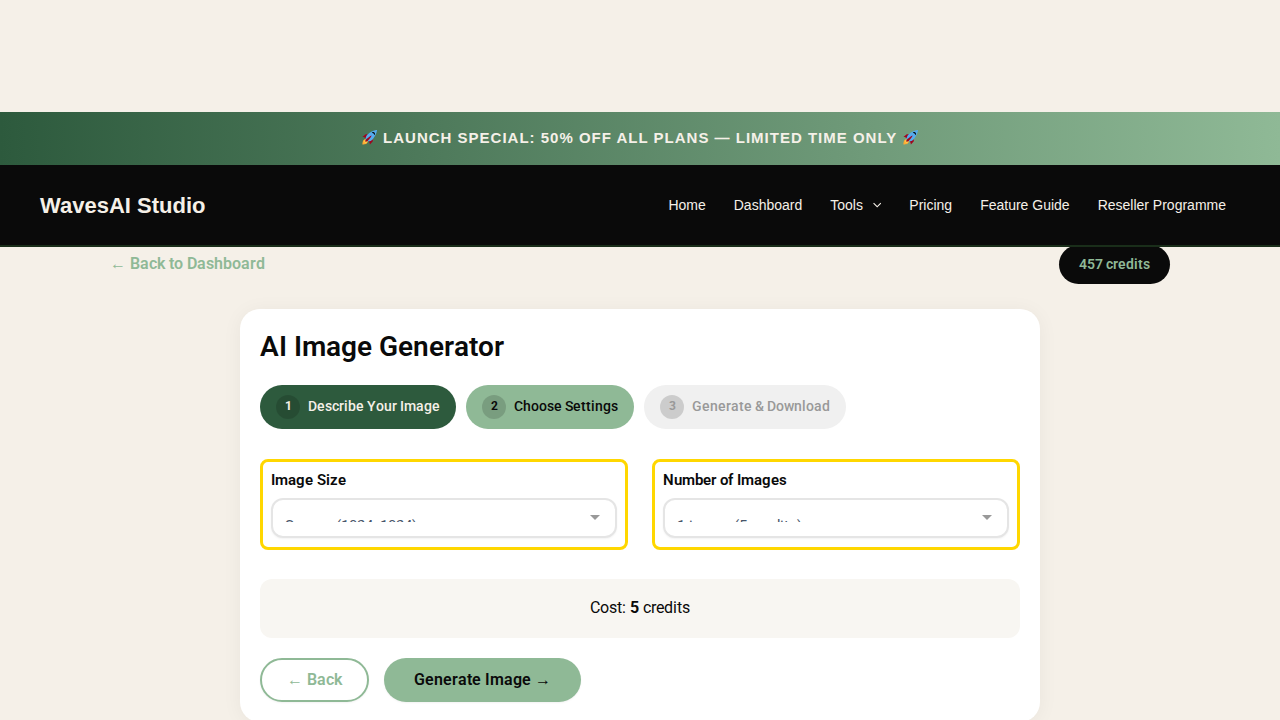
Image Size
Choose from multiple resolutions. Larger images are more detailed but take slightly longer to generate.
- 512 x 512 – Quick & small
- 768 x 768 – Medium quality
- 1024 x 1024 – High quality (recommended)
- 1536 x 1536 – Maximum detail
Number of Images
Generate multiple variations in one go. All images use the same prompt but each will be unique.
- 1 image – Single result
- 2 images – Compare variations
- 4 images – Maximum variety
Step 4: Generate & Download
Click the “Generate Image” button to start creating your image. The AI will process your prompt and generate the result in about 15-30 seconds.
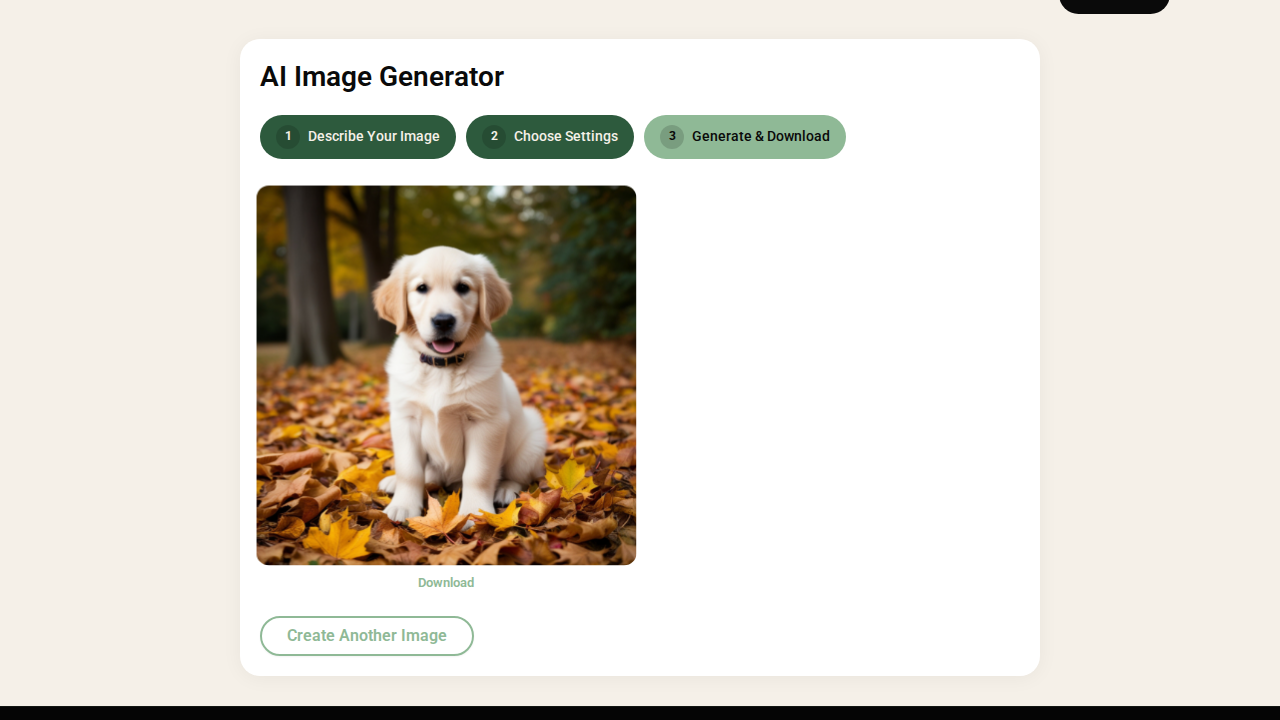
Once generated, your images will appear on screen. You can:
- Download each image individually
- Generate more with the same or different prompt
- Your images are also saved to your gallery for later access
Example Results
Here are some examples of images created with the AI Image Generator:


All images above were generated using WavesAI Studio’s Image Generator
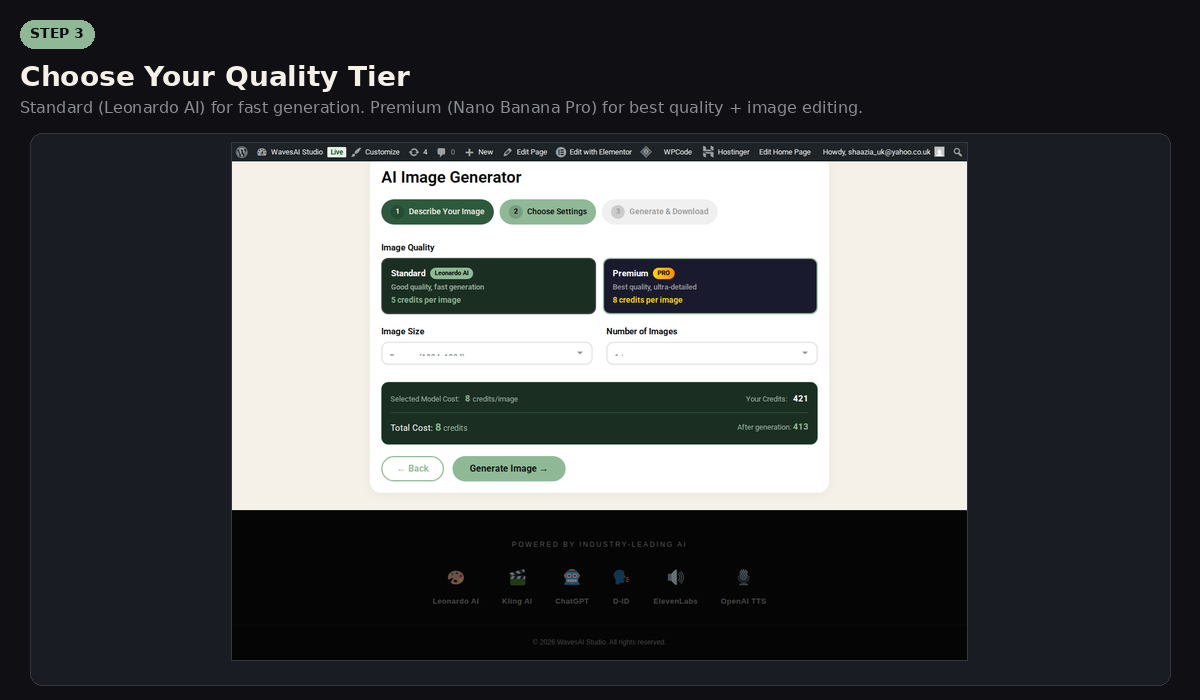
Standard vs Premium Quality
WavesAI Studio offers two quality tiers for image generation:
Standard Quality
Powered by Leonardo AI
5 credits
Good quality, fast generation. Great for quick ideas, drafts, and everyday content.
Premium Quality PRO
Powered by Nano Banana Pro (Google Gemini)
8 credits
Best quality, ultra-detailed and realistic. Supports reference images and image editing.
Select your quality tier in Step 2 before generating. The credit calculator will show you the exact cost and your remaining balance.
Image Editing & Compositing (Premium)
With Premium quality, you can upload reference images and ask the AI to edit, combine, or transform them. This is perfect for product placement, virtual try-ons, and creative compositing.
Tutorial: Put Sunglasses on a Model
Select Premium Quality
In Step 2, click the “Premium” quality card. Image editing features are only available with Premium.
Upload Your Reference Images
Click the “Upload Image” area and select your images. For this example, upload two images: the model’s photo and the sunglasses photo. You can upload up to 14 reference images.
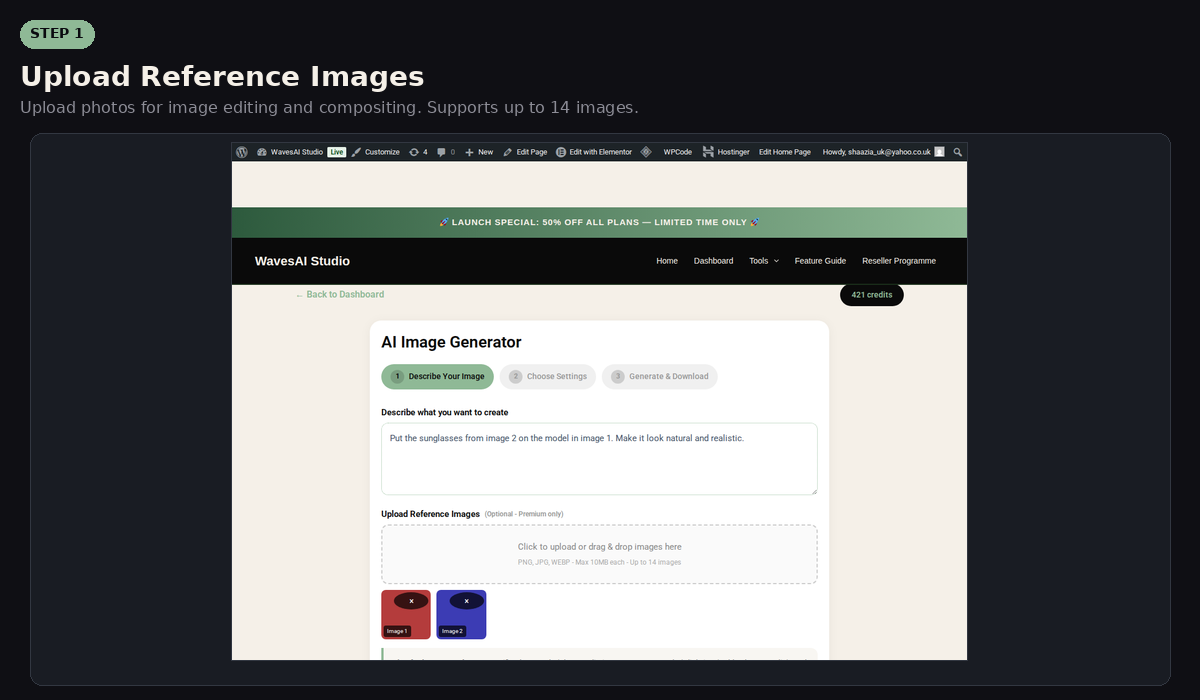
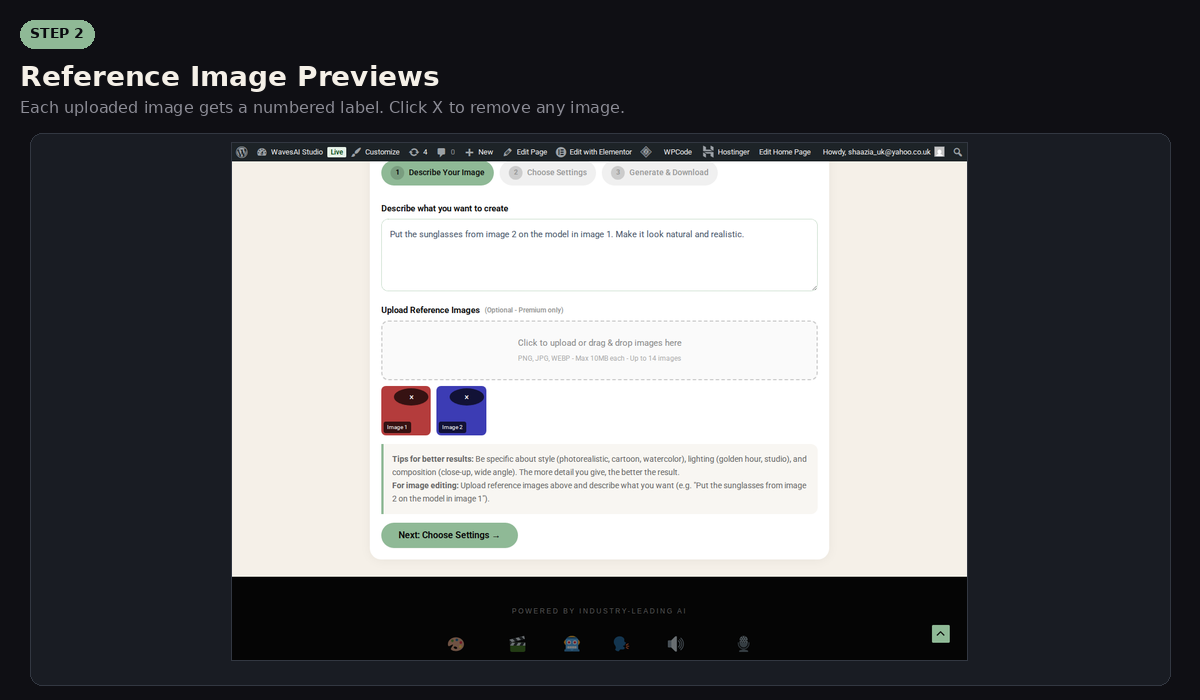
Write Your Editing Prompt
Describe what you want the AI to do with the images. For example:
Generate & Download
Click “Generate Image” and wait about 10 seconds. The AI will combine your images according to your instructions. Download the result or click Enlarge to view it in full size.
More Image Editing Examples

Virtual Try-On
Upload a person’s photo + a clothing item. Prompt: “Show the person wearing this outfit. Keep the person’s face and body proportions the same.”

Product Placement
Upload a room photo + a product image. Prompt: “Place this product on the coffee table in the room. Make it look like a real photograph.”
Style Transfer
Upload any photo. Prompt: “Transform this photo into a watercolour painting” or “Make this look like a Van Gogh painting.”

Background Swap
Upload a product on a white background. Prompt: “Place this product in a luxury store setting with marble surfaces and warm lighting.”
Best Prompt Tips
- Be specific: “A golden retriever puppy sitting in autumn leaves, soft lighting, professional photography” works better than “dog”
- Include style keywords: photorealistic, watercolour, digital art, cinematic, minimalist
- Mention lighting: golden hour, studio lighting, dramatic shadows, soft diffused light
- Add composition details: close-up, wide angle, bird’s eye view, symmetrical
- For image editing: Reference each uploaded image by its position (first image, second image) and describe exactly what you want changed

2. AI Chat Assistant
Your AI-Powered Copywriter & Marketing Expert
The AI Chat Assistant is your personal copywriter, powered by ChatGPT. It helps with social media content, marketing ideas, blog posts, email campaigns, product descriptions, and any text-based creative task. It remembers the conversation so you can refine results.
Step 1: Choose Your Mode
Open the AI Chat Assistant from your dashboard. You’ll see several specialist modes to choose from:
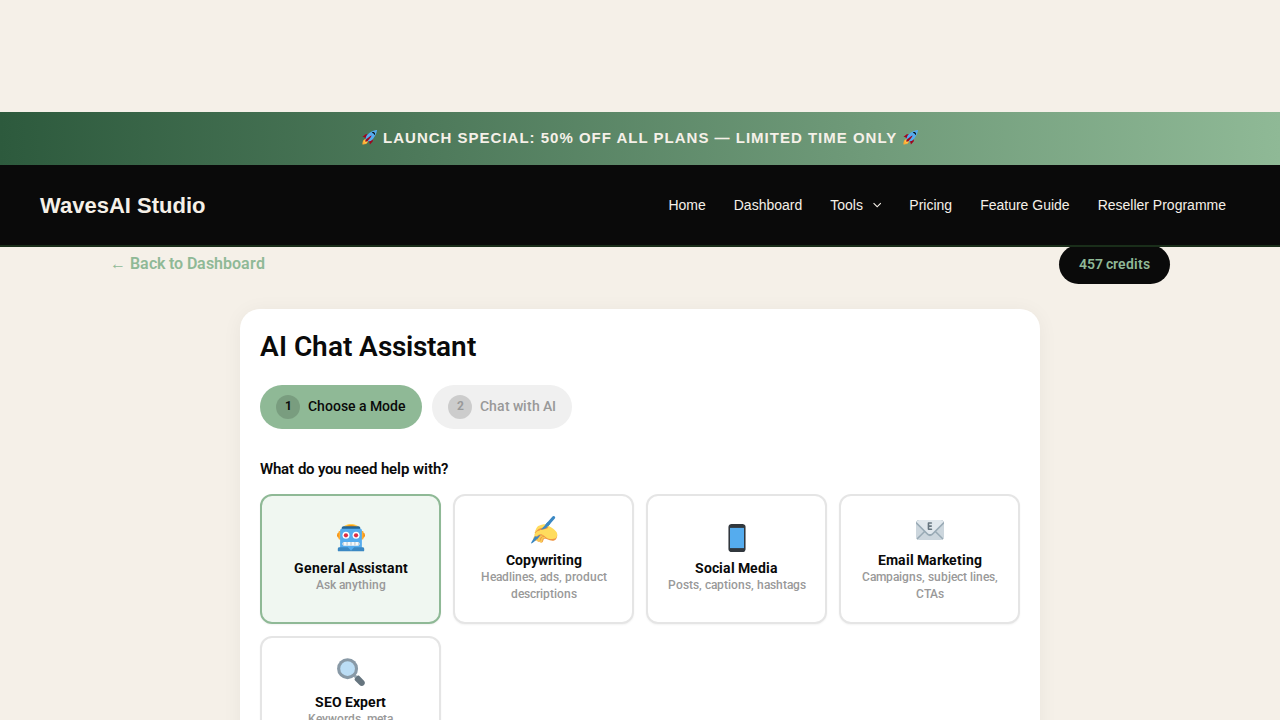

Copywriting
Ad copy, taglines, product descriptions

Social Media
Instagram, TikTok, LinkedIn posts

Email Marketing
Newsletters, campaigns, sequences
Step 2: Type Your Request
Type what you need in the chat box. Be as specific as you like – the AI understands natural language and context.

The AI responds within seconds. You can then continue the conversation to refine, expand, or adjust the output. Ask follow-up questions like “Make it shorter” or “Add more emojis” to get exactly what you want.
Credit Cost
2 credits
per message
What You Can Create
Social Media
Instagram captions, Twitter threads, LinkedIn posts, TikTok scripts
Marketing
Ad copy, email campaigns, landing page text, marketing plans
Content
Blog posts, articles, product descriptions, press releases
Strategy
Marketing strategies, SEO plans, competitor analysis, brainstorming
How to Use Each Mode
Each mode is specifically tuned to give you the best results for that type of content. Here’s how to get the most from each one:
 Copywriting Mode
Perfect for creating compelling marketing copy that converts.
How to use:
- Select Copywriting from the mode grid
- Click Start Chatting
- Tell the AI what you need, e.g. “Write 5 headline options for a luxury skincare brand launching a new serum”
- Refine by asking follow-ups like “Make headline 3 shorter” or “Add urgency”
Great for: Headlines, ad copy, product descriptions, taglines, calls-to-action, landing page text, brochure copy
Social Media Mode
Create engaging posts, captions, and hashtag strategies for any platform.
How to use:
- Select Social Media from the mode grid
- Click Start Chatting
- Tell the AI your platform and goal, e.g. “Write an Instagram caption for a coffee shop’s new autumn menu with relevant hashtags”
- Ask for variations: “Give me 3 more versions” or “Make it more casual for TikTok”
Great for: Instagram captions, TikTok scripts, LinkedIn posts, X/Twitter threads, Facebook posts, hashtag research, content calendars, bio writing. Supports multilingual content – ask the AI to write captions in any language for your global audience.
Email Marketing Mode
Craft professional email campaigns that get opened and clicked.
How to use:
- Select Email Marketing from the mode grid
- Click Start Chatting
- Describe your campaign, e.g. “Write a 3-email welcome sequence for new subscribers to my fitness coaching business”
- Refine: “Add a stronger CTA to email 2” or “Write 5 subject line options for email 1”
Great for: Welcome sequences, promotional campaigns, subject lines, CTAs, newsletter content, abandoned cart emails, re-engagement campaigns
 SEO Expert Mode
Optimise your content to rank higher in search results.
How to use:
- Select SEO Expert from the mode grid
- Click Start Chatting
- Ask for SEO help, e.g. “Suggest 10 keywords for a vegan bakery in London and write meta descriptions for each”
- Follow up: “Write an SEO-optimised blog outline for the top keyword”
Great for: Keyword research, meta titles and descriptions, SEO blog outlines, alt text for images, content optimisation suggestions, competitor keyword analysis
 Pro Tip: You can switch between modes during a session! Start with SEO Expert to find keywords, switch to Copywriting to create content, then use Social Media mode to adapt it for different platforms.
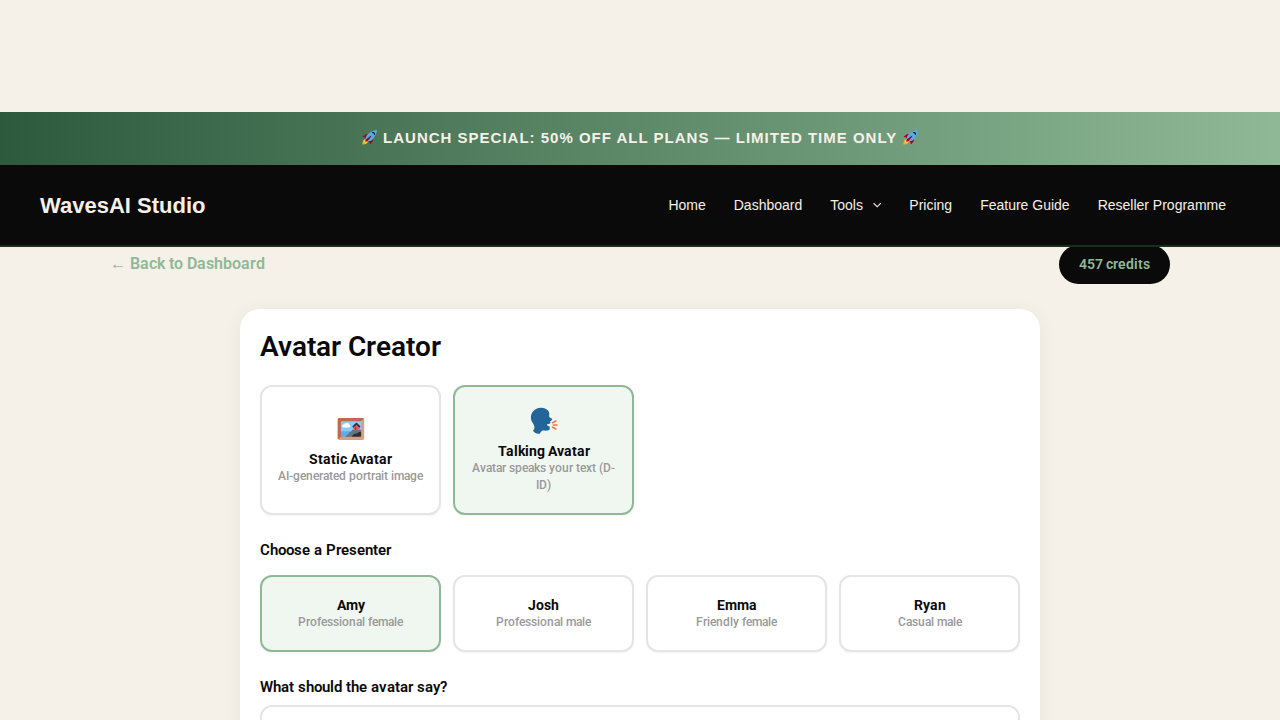
3. Avatar Creator
Create AI Avatars & Talking Video Presenters
The Avatar Creator combines two powerful tools: Static Avatars (AI-generated portrait images) and Talking Avatars (video presenters that speak your text). Create realistic human avatars, animated characters, or even make animals talk!
How to Create a Static Avatar
Open the Avatar Creator from your dashboard. You’ll see the avatar creation interface.
Step 1: Describe Your Avatar
Type a detailed description of the avatar you want. Include details about appearance, clothing, expression, and setting.
Step 2: Choose Style & Generate
Select your preferred avatar style, then click Generate to create your avatar.

Photorealistic
Lifelike portraits
Illustrated
Artistic style

Anime
Japanese animation

3D
3D rendered
How to Create a Talking Avatar
Talking Avatars create video presenters that speak your text. Choose from professional human presenters or use any image – even animals!
Step 1: Choose a Presenter
Select from professional presenters like Amy, Josh, Emma, or Ryan. Each comes with a different look and setting.
Step 2: Type What They Should Say
Enter the text you want your presenter to speak. The AI will animate the presenter’s face to lip-sync with the speech. You can type up to 500 characters.
Step 3: Generate & Download
Click “Create Talking Avatar” and wait for the AI to process your video (usually 30-60 seconds). Once ready, preview and download your talking avatar video.
Credit Cost
15 credits
per avatar (static or talking)

4. AI Video Creator
Create Stunning Videos From a Simple Text Prompt
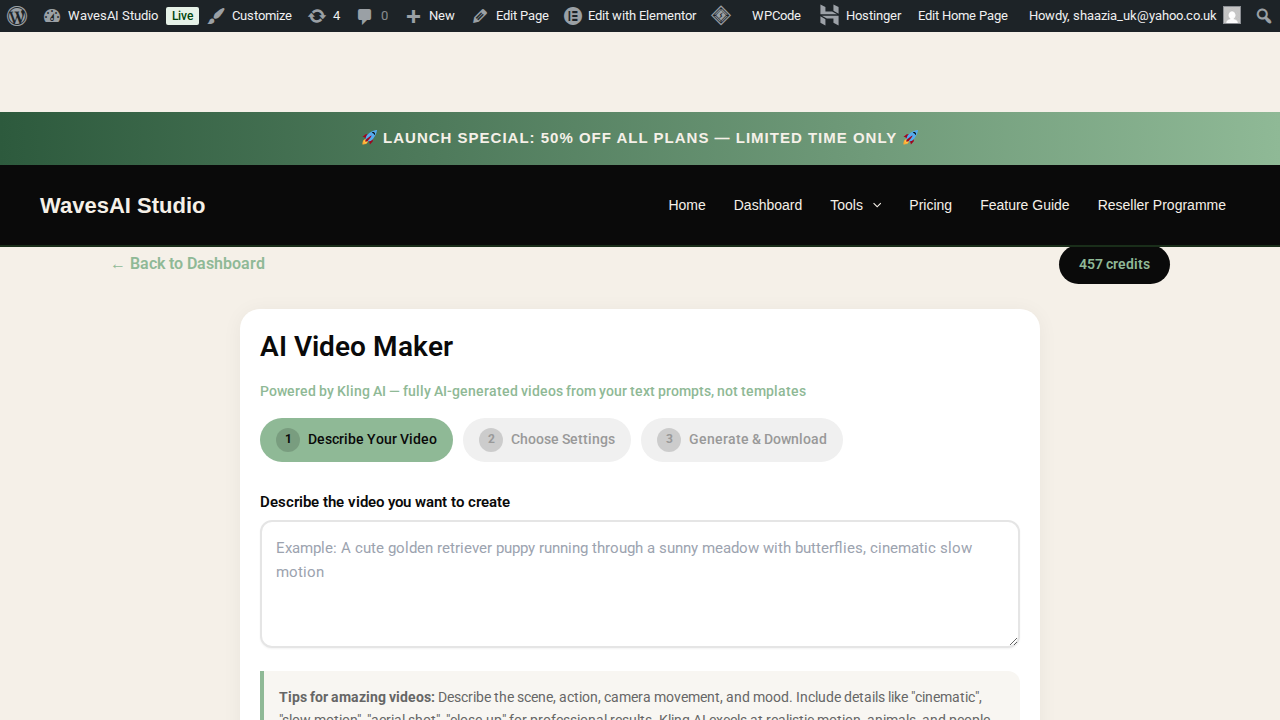
The AI Video Creator lets you make professional videos from a simple text description. Just tell the AI what you want, and it finds the perfect footage, adds styled text overlays, and assembles everything into a polished video – complete with natural sound from the footage.
In this guide, we’ll walk you through how to create a cute kitten video and a recipe video step by step.
Step 1: Describe Your Video
Navigate to the AI Video Creator from your dashboard. You’ll see the video creation interface with a simple prompt box at the centre.
Type your video description into the prompt field. Here’s a prompt you can try:
The AI will use your description to find matching footage and generate text overlays for each scene. The more descriptive you are, the better the result.
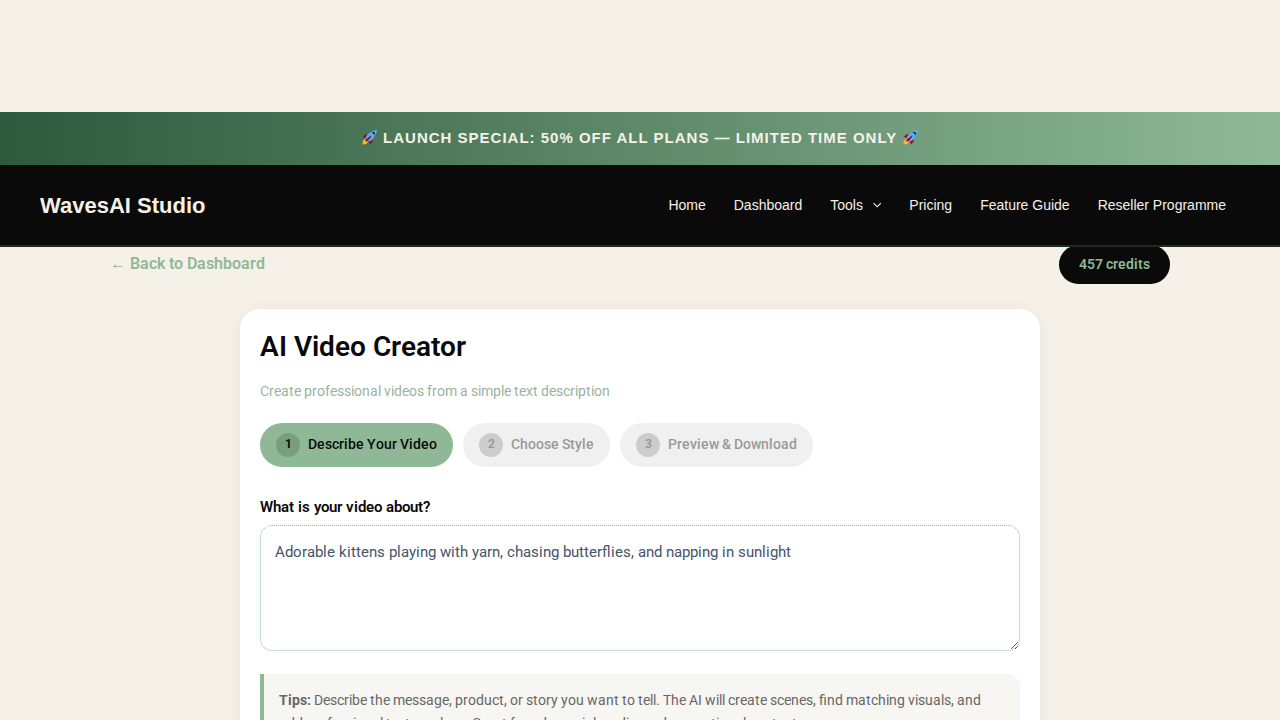
Once you’ve written your prompt, click “Next: Choose Style” to move to the next step.
Step 2: Choose Your Style & Settings
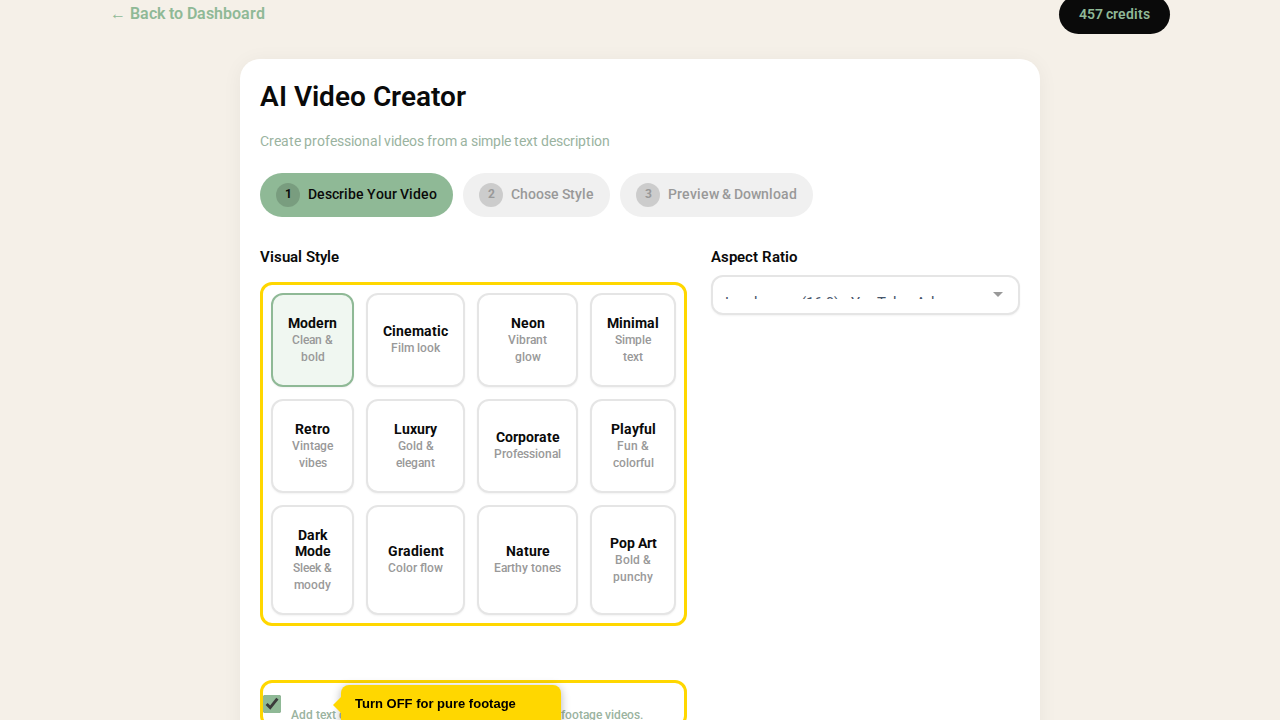
Now you’ll choose how your video looks. WavesAI Studio offers 12 visual styles that control the text fonts, colours, and overall mood of your video.
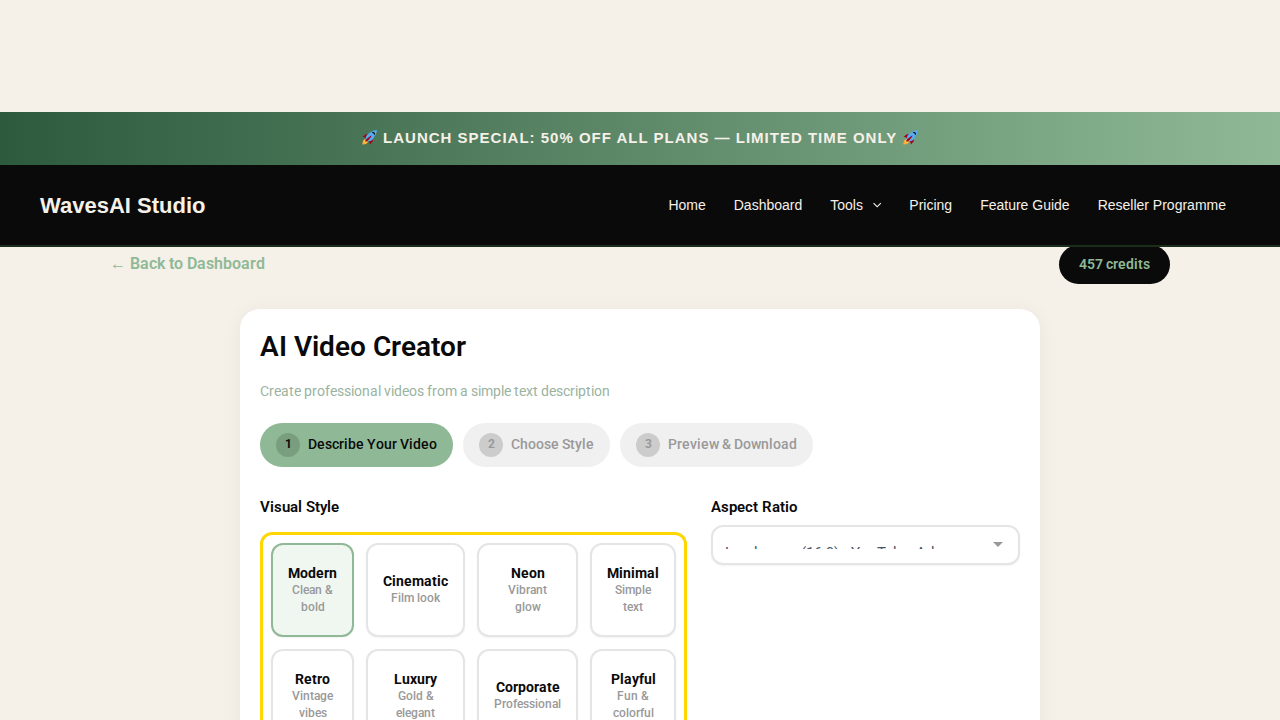
The available styles are:
Cinematic – Film look
Neon – Vibrant glow
Minimal – Simple text
Retro – Vintage vibes
Luxury – Gold & elegant
Corporate – Professional
Playful – Fun & colorful
Dark Mode – Sleek & moody
Gradient – Color flow
Nature – Earthy tones
Pop Art – Bold & punchy
Next, choose your Aspect Ratio: Landscape (16:9) for YouTube, Portrait (9:16) for TikTok and Reels, or Square (1:1) for Instagram.
The Text Overlay Toggle
This is one of the most important settings. The Text Overlay checkbox controls whether text captions appear on your video. Captions are multilingual – you can write your text overlays in any language, making it easy to create video content for audiences worldwide.
Text Overlay ON
Best for: Recipe videos, product ads, promotional content, tutorials, social media posts with captions.
The AI adds styled text on each scene. You can edit the text afterwards.
Text Overlay OFF
Best for: Cute animal clips, nature footage, ambient videos, background visuals, mood videos.
Pure footage with natural sounds only. No text, no overlay – just the raw video.
For our kitten video example, we’ll turn Text Overlay OFF to get beautiful pure kitten footage with natural meowing and purring sounds.
HD AI Generation (Premium Upgrade)
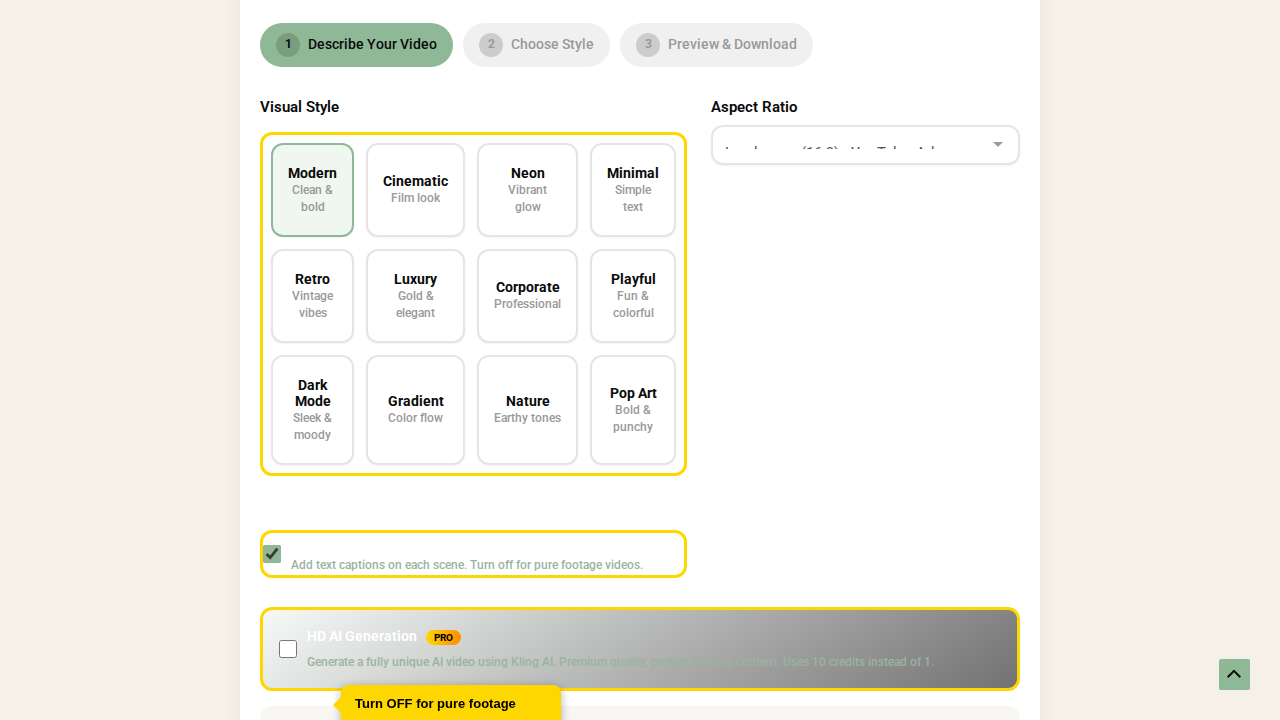
For content that needs to be truly unique, enable the HD AI Generation toggle (marked with a PRO badge). This uses advanced AI to generate fully original video from scratch – not stock footage, but completely new AI-created visuals. Perfect for brand hero videos, high-end ads, and premium content. This uses 10 credits per video instead of 1.
Step 3: Generate & Preview
Click “Generate Video” and the AI will:
- Break your prompt into 4-5 individual scenes using AI
- Search for matching footage for each scene (kittens playing, kittens with yarn, butterflies, sleeping kittens, etc.)
- Assemble the scenes with natural audio from the footage
- Render a preview on screen for you to watch
The preview plays right in your browser. Click “Play Preview” to watch the full video with all scenes and transitions.
Step 4: Edit & Customise Your Scenes
Below the video preview, you’ll find the Scene Editor. This is where the magic happens – you can fine-tune every scene before downloading:
Edit Text
Each scene has an editable text box. Change any caption directly – for example, change “Fresh Coffee” to “Our Artisan Blend” for a coffee shop ad. When text overlay is off, these are disabled.
Swap Footage
Don’t like a particular clip? Each scene has a search keyword field. Type a new keyword like “kitten sleeping” or “kitten yawning” and click “Swap” to instantly get different footage. No extra credits charged for swapping!
Preview Individual Scenes
Click on any scene card to preview just that scene on the canvas. This lets you check each scene before committing.
Apply & Refresh
After making your edits, click “Apply Changes & Refresh Preview” to see the updated video with your changes.
Step 5: Download Your Video
Happy with the result? Click “Download Video” to export your finished video. The system will record all scenes with their audio and package it into a downloadable video file. Your video is ready to share on social media, embed on your website, or use in presentations!
Example: Creating a Recipe Video
Recipe videos work differently – you want text overlays to show the cooking steps. Here’s how:
- Type your recipe prompt: “Step by step chocolate cake recipe – preheat oven, mix ingredients, bake, and decorate”
- Choose a clean style like “Modern” or “Minimal” for readable text
- Keep Text Overlay ON – recipe videos need the step-by-step captions
- After generation, use the Scene Editor to perfect each step’s text – change “Mix Ingredients” to “Mix flour, sugar, and cocoa powder” for more detail
- Swap footage if you want different cooking clips – try keywords like “chocolate mixing” or “cake decorating”
- Download and share your recipe video on Instagram, TikTok, or YouTube!
Tutorial: Create Viral AI Kitten Videos
Learn how top creators build pages with 70K+ followers using AI-generated kitten content
AI-generated animal content is one of the fastest-growing trends on social media. Pages like Phaktra (71K followers) post AI videos of cats wearing pajamas, drinking coffee, and doing everyday human activities – and they go viral every time. Here’s how to create the same content on WavesAI Studio:
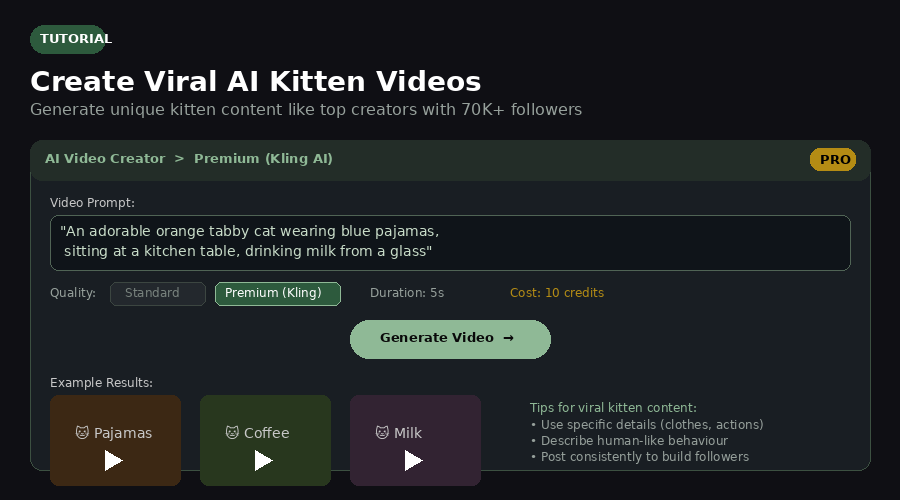
Go to Video Maker and Select Premium Quality
Open the AI Video Creator from your dashboard. Select Premium (Kling AI) quality – this is essential for generating fully AI-created videos rather than stock footage. Premium costs 10 credits per video.
Write a Detailed Prompt
The secret to viral kitten content is being very specific about what the cat is doing. Describe human-like actions, clothing, and settings. Here are proven prompts:
Generate and Download
Click Generate Video and wait about 30-60 seconds. Kling AI will create a fully original 5-second video with realistic cat movements and expressions. Download the result and post it on Instagram, TikTok, Facebook, or YouTube Shorts.
Build a Content Page
The key to building a following is consistency. Generate 2-3 kitten videos per day and post them across all your social platforms. Use the WavesAI Content Scheduler to queue posts automatically. Within weeks you can build a page with thousands of followers – the content practically goes viral on its own!
Prompt Tips for Viral Kitten Content
- Be specific about clothing: “blue pajamas with moon patterns” beats “wearing clothes”
- Describe human activities: drinking coffee, reading a newspaper, cooking, gardening
- Set the scene: “cozy morning light”, “warm bakery”, “rainy window” adds atmosphere
- Specify the cat breed: orange tabby, fluffy white Persian, black cat, calico
- Use emotions: “sleepy”, “curious”, “excited”, “relaxed” makes the video more engaging
- Not just cats! This works with dogs, rabbits, hamsters, pandas – any cute animal
Credit Cost
1 credit
Standard AI Video Creator
10 credits
HD AI Generation (Premium)
Best Prompt Tips
- Be descriptive: “Cute golden retriever puppies playing in a park with autumn leaves” works better than “dog video”
- For recipes, mention each step: “Mix, bake, decorate, serve”
- For nature/animal videos, turn text overlay OFF for a cleaner look
- Use the Scene Editor to fine-tune text and swap clips after generation
- 9:16 is perfect for TikTok/Reels, 16:9 for YouTube, 1:1 for Instagram posts

5. Text to Speech
Turn Any Text Into Natural-Sounding Voiceovers
The Text to Speech tool converts written text into professional-quality voiceovers using OpenAI’s advanced AI voices. Choose from 6 different voice personalities, type your script, and download a ready-to-use MP3 in seconds.
 Multilingual Support
Text to Speech supports 29+ languages including English, Spanish, French, German, Italian, Portuguese, Chinese, Japanese, Korean, Arabic, Hindi, and many more. Simply type your script in any supported language and the AI will generate natural-sounding speech. Perfect for creating content for a global audience.
Perfect for YouTube narrations, podcast intros, e-learning courses, audiobooks, and automated phone messages. Let’s walk through how to create your first voiceover.
Step 1: Open Text to Speech
From your dashboard, click the “Text to Speech” card. You’ll see the voice selection panel with 6 AI voice options, each with a unique personality.
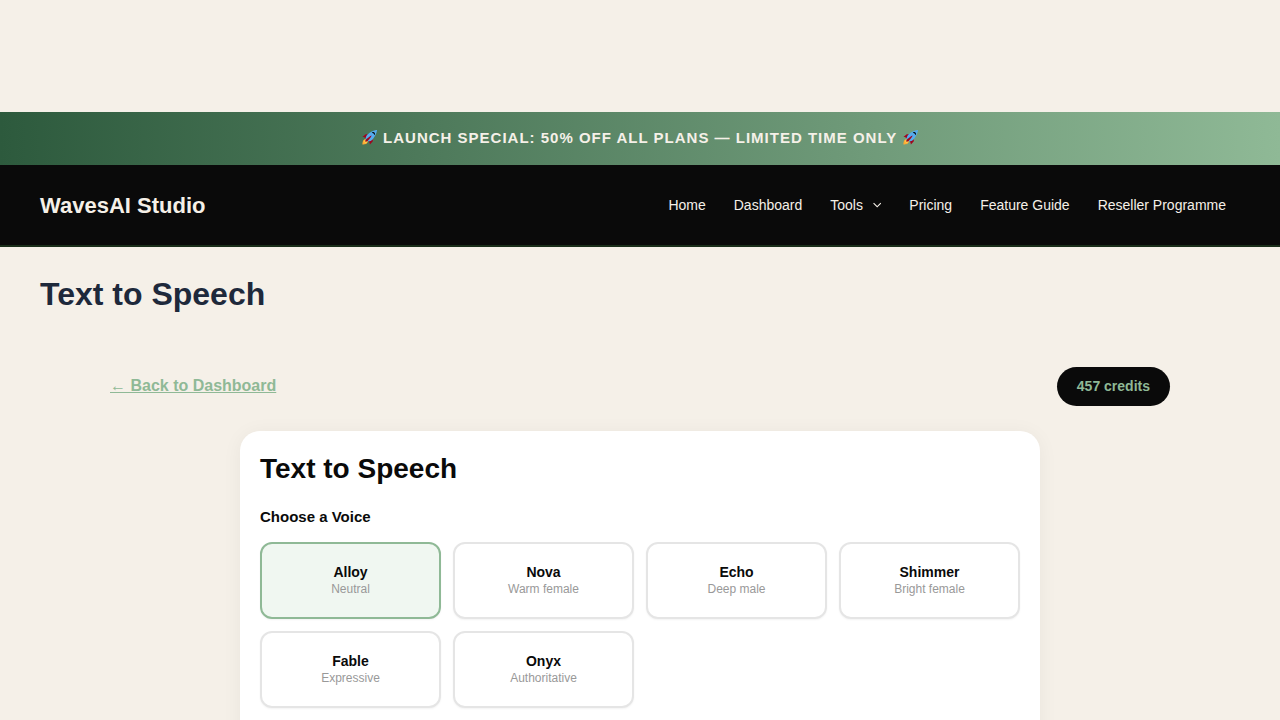
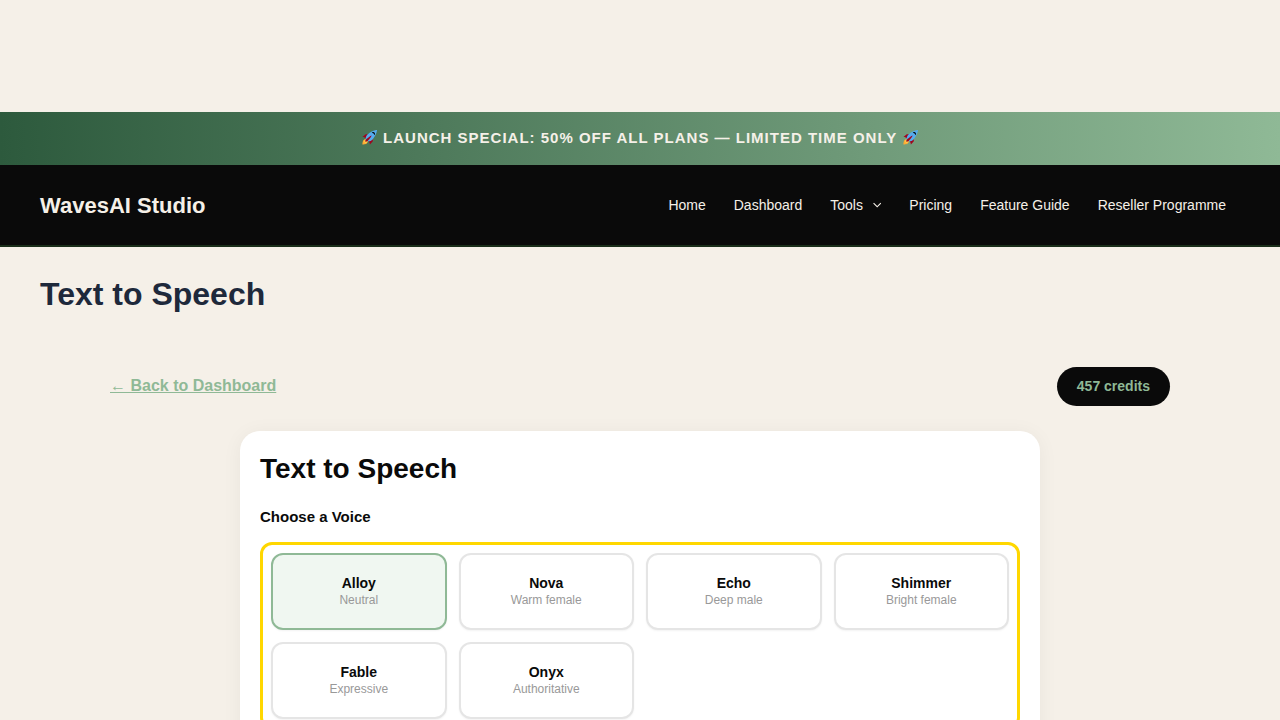
Step 2: Choose Your Voice
Click on any voice card to select it. The selected voice will be highlighted in green. Each voice has a unique character suited to different types of content.
Alloy
Neutral, professional – great for corporate content and presentations
Nova
Warm female voice – perfect for narrations and storytelling
Echo
Deep male voice – ideal for tutorials and explainers
Shimmer
Bright female voice – great for meditation and wellness
Fable
Expressive voice – perfect for audiobooks and stories
Onyx
Authoritative voice – ideal for trailers and ads
Step 3: Enter Your Script
Type or paste the text you want converted to speech. You can enter up to 4,096 characters per generation. Write naturally, as if you’re speaking – the AI uses punctuation to create natural pauses and emphasis.

Tips for Better Results
- Write naturally, as if you’re speaking out loud
- Use punctuation for natural pauses – commas for short pauses, periods for longer ones
- Use exclamation marks for emphasis and energy
- Break long text into paragraphs for better pacing
Step 4: Generate and Download
Click the “Generate Audio” button. The AI processes your text in seconds and creates a natural-sounding voiceover. You’ll see a built-in audio player to preview the result, plus a download button to save the MP3 file.
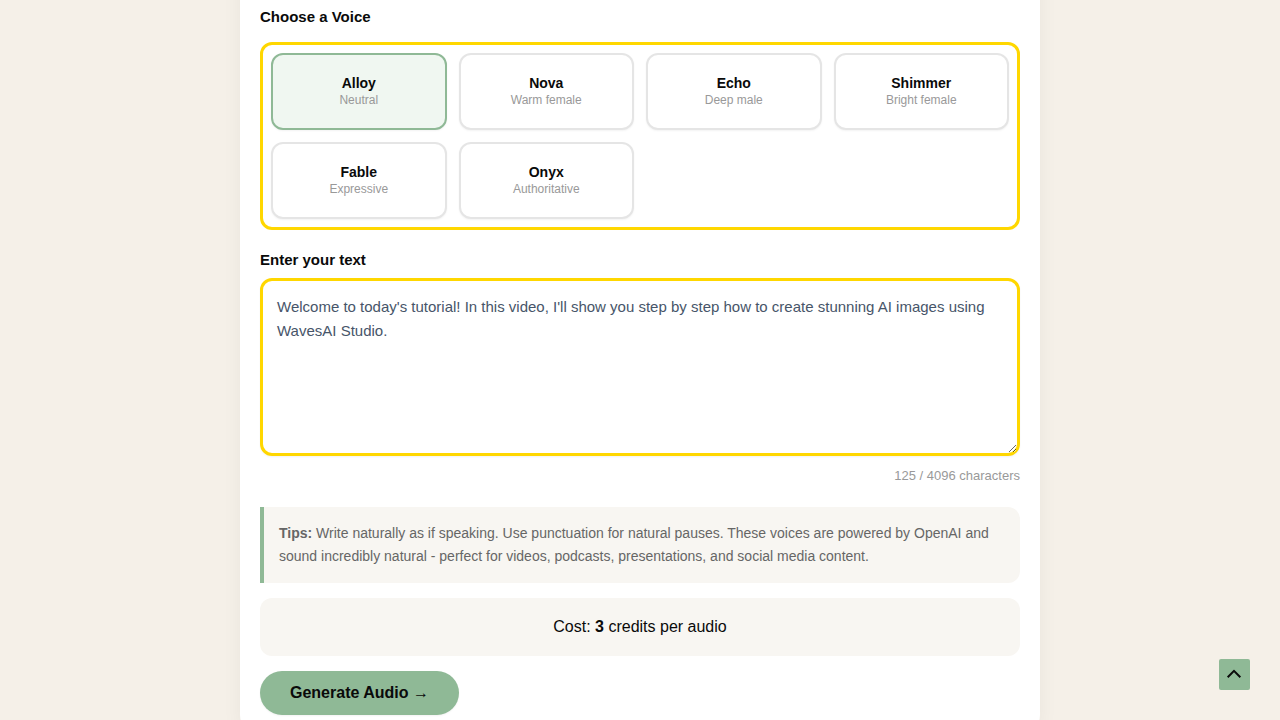
3 Credits
Per voiceover generation
4,096
Max characters per generation
6
Unique AI voice styles
Popular Use Cases
YouTube Narration
Create professional voiceovers for videos without recording yourself
Podcast Intros
Generate consistent, polished intros and outros for your podcast
E-Learning
Narrate online courses and training materials with clear AI voices
Social Media
Add voiceovers to Instagram Reels, TikToks, and short-form content

6. Sound Effects Generator
Create Any Sound Effect From a Text Description
The Sound Effects Generator uses ElevenLabs AI to create custom sound effects from text descriptions. Need rain sounds? Thunder? A coffee shop ambience? Just describe it and the AI generates it instantly.
No more searching through sound libraries or paying for subscriptions. Create exactly the sound you need in seconds.
Step 1: Open the Sound Effects Generator
From your dashboard, click the “Sound Effects” card. You’ll see the sound description input with example prompts to inspire you.
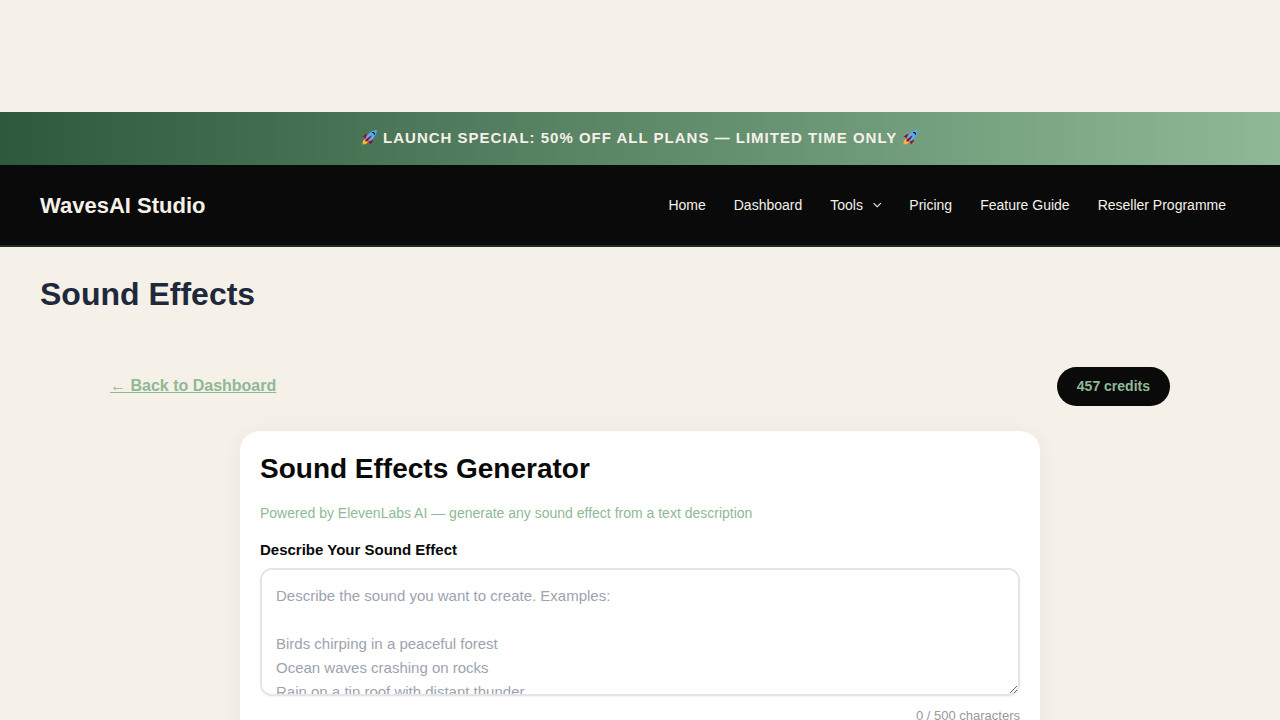
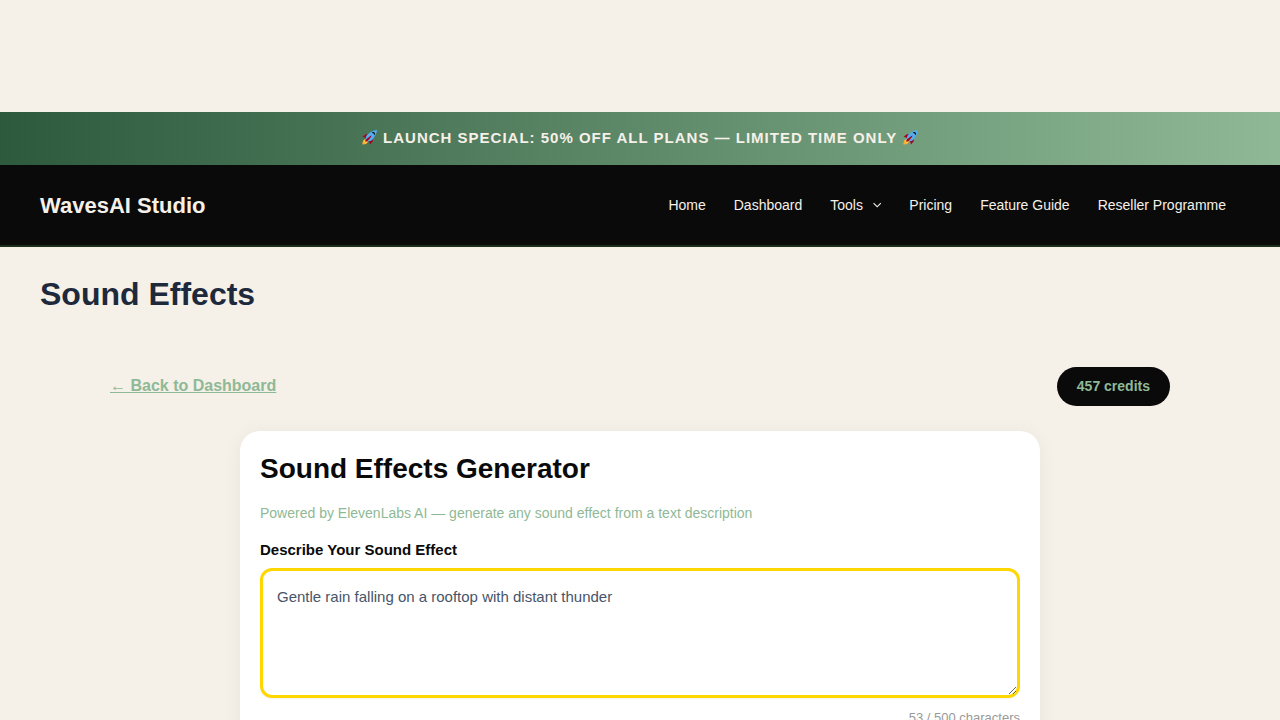
Step 2: Describe the Sound You Want
Type a detailed description of the sound effect you need. The more specific you are, the better the result. For example, instead of just “rain”, try “gentle rain falling on a rooftop with distant thunder”.
Step 3: Set Duration and Generate
Optionally choose a specific duration (1-22 seconds), or leave it on auto for the AI to decide the best length. You can also use the Popular Sound Effects preset buttons for quick one-click generation of common sounds like Rain, Thunder, Ocean, Birds, Fire, Wind, City, and Forest.
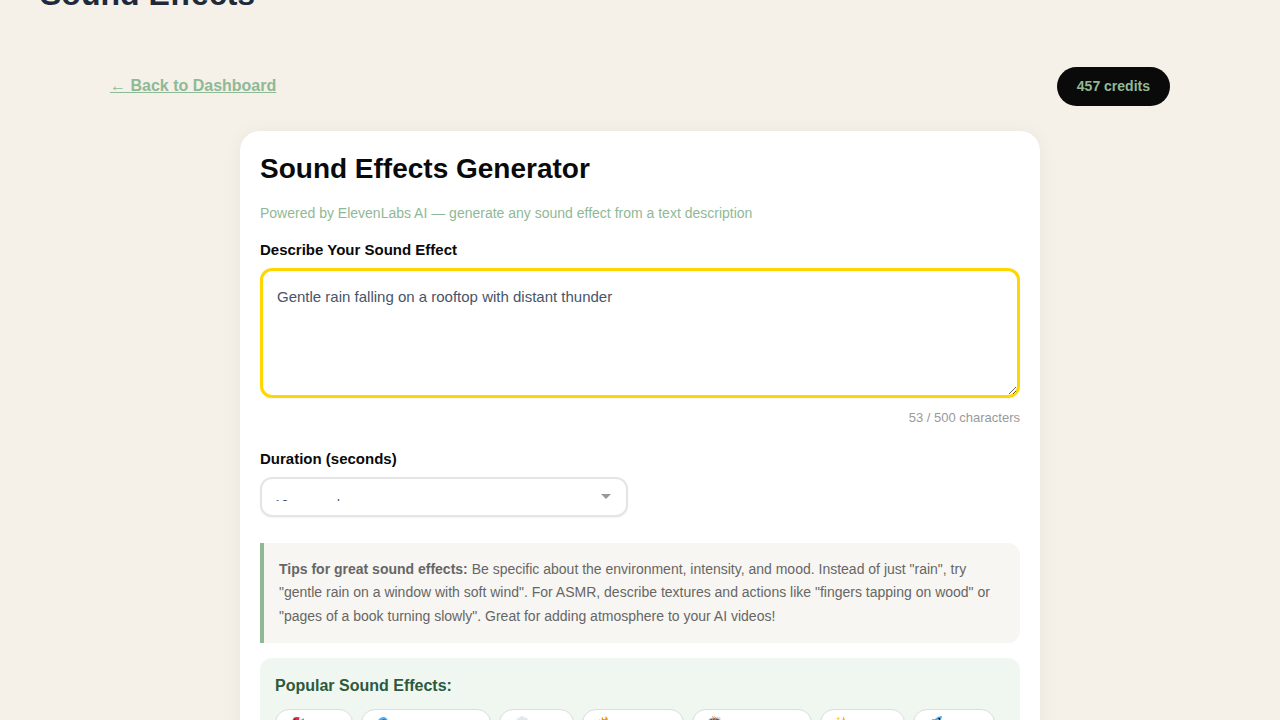
Prompt Tips for Better Sound Effects
- Be specific about environment: “rain on a tin roof” vs just “rain”
- Add mood and intensity: “gentle breeze through autumn leaves” vs “wind”
- Combine multiple elements: “coffee shop with chatting, cups clinking, and soft jazz”
- Describe textures: “fingers tapping on wood” or “pages of a book turning slowly”
3 Credits
Per sound effect generation
1-22s
Custom duration range
8
One-click preset sounds
Popular Use Cases
Video Backgrounds
Add atmosphere to your videos with custom ambient sounds
Podcast Production
Create unique intro/outro sounds and transition effects
ASMR Content
Generate specific textures and ambient sounds for relaxation
Game Audio
Create custom sound effects for games and interactive media
How to Create YouTube Tutorial Videos
Combine AI Video + Voiceover for Professional Tutorials
One of the most powerful ways to use WavesAI Studio is combining the AI Video Creator and Text to Speech tools to produce complete YouTube tutorial videos with professional voiceovers – all without a camera or microphone.
Here’s a step-by-step walkthrough of how to create a tutorial video from scratch.
Step 1: Plan Your Tutorial Script
Start by writing out what your tutorial will cover. Break it into short scenes (3-5 seconds each) that match the visual content. For example, if you’re making a “How to Start a Coffee Shop” tutorial:
Example Script Breakdown:
| Scene 1 | Welcome intro with coffee shop footage | Voiceover: Intro |
| Scene 2 | Location scouting and market research | Voiceover: Step 1 |
| Scene 3 | Business plan and budgeting | Voiceover: Step 2 |
| Scene 4 | Opening day tips and final thoughts | Voiceover: Outro |
Step 2: Create the Video
Open the AI Video Creator from your dashboard and type your topic as a prompt. The AI will automatically generate scenes with relevant footage. For tutorials, you’ll usually want Text Overlay turned ON so viewers can follow along with key points on screen.
Pro Tip: Use the Scene Editor
After the AI generates your scenes, use the Scene Editor to fine-tune the text on each scene, swap footage clips, and preview individual scenes before exporting. This gives you full creative control over your tutorial content.
Step 3: Choose Your Style
Select a visual style that matches your tutorial’s tone. For professional tutorials, Corporate, Modern, or Minimal styles work best. For creative tutorials, try Cinematic or Neon.
Step 4: Export Your Video
Make sure Text Overlay is ON for tutorial videos (so key points appear on screen), choose your quality settings, and click “Create Video”. Your video will render with text captions on each scene and natural footage audio.
Step 5: Create the Voiceover
Now open the Text to Speech tool. Write your tutorial narration script – this is what you want the AI voice to say over your video. Choose a voice that fits your content (Echo or Alloy work great for tutorials).
Example Narration Script:
“Welcome to today’s tutorial! In this video, I’ll show you step by step how to start your very own coffee shop from scratch. We’ll cover everything from finding the perfect location, to creating your menu, to preparing for opening day. Let’s get started!”
Step 6: Combine Video + Voiceover
Download both files – your video (.webm) and your voiceover (.mp3). Then combine them using any free video editor:
1
Import Video
Drag your .webm video into the editor timeline
2
Add Voiceover
Add the .mp3 audio to a separate audio track
3
Export & Upload
Export as MP4 and upload directly to YouTube
Free Video Editors You Can Use
- CapCut – Free, easy to use, perfect for beginners (desktop + mobile)
- DaVinci Resolve – Professional-grade, free version has everything you need
- Clipchamp – Built into Windows 11, simple drag-and-drop editing
- iMovie – Free on Mac, straightforward video + audio combining
Complete Tutorial Video Workflow
AI Video Creator
Creates your video with scenes, footage, and text overlays (1 credit)
Text to Speech
Creates the voiceover narration for your tutorial (3 credits)
Sound Effects (Optional)
Add intro music, transitions, or ambient sounds (3 credits)
Total Cost
Just 4-7 credits for a complete YouTube tutorial video
No Camera, No Microphone, No Problem
With WavesAI Studio, you can produce professional YouTube tutorials entirely with AI. The video creator generates visuals, and the text to speech tool provides the narration. Start your YouTube channel today without any recording equipment.

7. Credit System & Pricing
How Credits Work
Every tool uses credits. Credits are included with subscription plans and reset monthly. Users can also buy one-time credit bundles for extra usage.
Credit Cost Summary
| Tool | Credits | What You Get |
|---|---|---|
| AI Image Generator | 5 credits | 1-4 AI-generated images |
| AI Chat Assistant | 2 credits | 1 AI conversation message |
| Avatar Creator | 15 credits | 1 static or talking avatar |
| AI Video Maker | 10-20 credits | 1 AI video (5s or 10s) |
| Text to Speech | 3 credits | 1 audio file (up to 4,096 chars) |
| Sound Effects | 3 credits | 1 custom AI sound effect |
Subscription Plans
Plans are managed through WooCommerce subscription products. Each plan includes a monthly credit allocation that resets automatically. Users can upgrade/downgrade at any time.
Credit Bundles
One-time credit bundle purchases add credits on top of the subscription allowance. These do not expire and carry over month to month.

8. Reseller Programme
How It Works
Every registered user gets a unique referral link. When someone signs up through that link:
- Signup bonus: The referrer earns 10 free credits instantly
- Purchase commission: When the referred user makes any purchase, the referrer earns 20% of the order value as bonus credits
- Lifetime tracking: The referral link is tracked for 30 days via cookie, and the referral relationship is permanent
Accessing the Reseller Dashboard
- Log in to your WavesAI Studio account
- From the main dashboard, click “View Programme” on the Reseller Programme card
- Or navigate directly to wavesaistudio.com/reseller-programme/
- Copy your unique referral link and share it
What Resellers See
- Total referrals count
- Number of converted (paying) referrals
- Total credits earned from referrals
- Full commission history with dates
- Marketing tips and strategies
Commission Settings
Resellers can choose how to receive their earnings:
- Credits: Commission is added as bonus credits to use on AI tools
- Cash (GBP): Commission is accumulated as cash balance, payable via PayPal when reaching the minimum threshold
To change your preference, go to the Reseller Programme page and click either “Credits” or “Cash (GBP)” in the Commission Settings section.
White-Label Reselling
The white-label option lets resellers offer WavesAI under their own brand name. Here is how to set it up:
- Go to the Reseller Programme page from your dashboard
- Scroll down to the White-Label Branding section
- Enter your Brand Name (e.g. “MyAI Studio” – this replaces “WavesAI Studio” for your clients)
- Choose your Brand Colour using the colour picker
- Optionally add your Logo URL (upload your logo somewhere and paste the URL)
- Click Save Branding
Once saved, when clients visit your referral link, they will see your brand name, colour, and logo instead of WavesAI branding. This is perfect for:
- Agencies: Offer AI content creation as part of your service package
- Freelancers: Add an AI tools offering under your personal brand
- Entrepreneurs: Launch your own AI content platform without building the technology
Frequently Asked Questions
Where are my generated images and videos stored?
Your generated images and videos are hosted on external AI provider servers (Leonardo AI, PiAPI, etc.) – they are NOT stored on your WordPress hosting. This keeps your website fast and lightweight. You can always download your creations directly after generation, and they will also appear in the “My Generations” gallery on your dashboard for easy access.
What happens to reference images I upload?
Reference images you upload for Premium image editing are temporarily stored on the server and automatically cleaned up after 24 hours. This keeps storage usage minimal. The AI only needs them during the generation process.
How long do generated images stay available?
Generated images are available on the AI provider’s CDN for a limited time (typically 7-30 days). We recommend downloading your favourite creations right after generating them. Your generation history and prompts are always saved in your dashboard.
What is the difference between Standard and Premium quality?
Standard (powered by Leonardo AI) costs 5 credits per image and generates from text prompts only. Premium (powered by Nano Banana Pro / Google Gemini) costs 8 credits per image and supports both text prompts AND reference image uploads for editing, compositing, and style transfer.
Can I use generated content commercially?
Yes! All plans include commercial usage rights. You can use your AI-generated content for marketing, social media, advertising, client work, and more.
Do credits expire?
Monthly plan credits reset each billing cycle. Purchased credit packs (one-time purchases) never expire and stay in your account until used.
What happens if generation fails?
If an AI generation fails for any reason, your credits are automatically refunded to your account. You will never lose credits due to a failed generation.
Creative Tutorials
Step-by-step guides for popular AI video styles
Tutorial 1
Create a Talking Avatar Ad
Create a professional spokesperson video that advertises your brand – perfect for product launches, promotions, and social media ads.
Step 1: Generate Your Spokesperson Image
Go to Tools > AI Image Generator. Type a prompt describing your ideal spokesperson:
“A professional female model holding a luxury gold watch, elegant studio lighting, looking at camera, waist-up portrait, photorealistic, 4K quality”
Step 2: Choose Settings and Generate
Click “Next: Choose Settings”. Select Square (1024×1024) for social media or Widescreen (1280×720) for YouTube. Choose Standard quality (5 credits) or Premium (8 credits) for ultra-detail. Click “Generate Image”.
Step 3: Create the Talking Video
Download your generated image. Go to Tools > Avatar Creator. Upload the spokesperson image you just created.
Step 4: Write Your Ad Script
In the text box, type your ad script. For example:
“Introducing the new Luxorra Gold Collection. Timeless elegance meets modern sophistication. Visit luxorra.com and discover your signature piece today.”
Step 5: Choose Voice and Generate
Select a voice that matches your brand (professional female, deep male, etc.). Click “Create Avatar”. Your talking spokesperson video will be ready in about 30-60 seconds. Download it and share on your social media channels!
Pro Tip: Use the Content Scheduler to post your avatar ad directly to Facebook and Instagram. Go to Tools > Content Scheduler, upload the video, and schedule it for the best engagement time.
Tutorial 2
Kittens Doing Human Activities
Create adorable viral videos of kittens cooking, working, and doing everyday human things – perfect for social media engagement and viral content.
Step 1: Generate Your Kitten Scene
Go to Tools > AI Image Generator. Create the perfect kitten scene with a detailed prompt:
“An adorable fluffy orange kitten wearing a tiny chef hat and apron, standing on hind legs at a kitchen counter, pouring milk into a cup, cosy morning light, photorealistic, incredibly detailed”
More ideas: “kitten sitting at a desk typing on a laptop”, “kitten reading a newspaper with tiny glasses”, “kitten doing yoga on a mat”, “kitten painting on a canvas with a tiny brush”
Step 2: Generate the Image
Select Square (1024×1024) or Widescreen (1280×720) for video. Use Premium quality for the most realistic kitten. Click “Generate Image”. If you love it, download it!
Step 3: Bring It to Life with Video
Go to Tools > Video Maker. Upload your kitten image. Add a motion prompt describing what should happen:
“The kitten stirs the cup with a tiny spoon, looks up at the camera and tilts its head”
Step 4: Generate and Download
Click “Generate Video”. The AI will animate your kitten image into a short video clip (usually 3-5 seconds). Download your video.
Step 5: Add Music
For the finishing touch, add background music using any free video editor (CapCut, iMovie, or InShot on mobile). Choose fun, upbeat music to match the kitten’s activity. This makes it perfect for TikTok, Reels, and Shorts!
Pro Tip: Create a series of kitten scenes (morning routine, office day, cooking dinner) and combine them into a “day in the life” video. These go viral on social media!
Tutorial 3
Talking Kittens (Baby Voice)
Create adorable kittens that “talk” with cute baby-like voices – the ultimate viral content for social media.
Step 1: Generate a Kitten Portrait
Go to Tools > AI Image Generator. Create a close-up kitten portrait facing the camera (important for the talking animation):
“Close-up portrait of an adorable baby kitten with big round eyes, looking directly at camera, soft lighting, fluffy fur, photorealistic, studio quality”
Important: The kitten must be facing the camera with its mouth visible. This gives the best talking animation results.
Step 2: Generate and Download
Use Square (1024×1024) format. Click “Generate Image”. Once your cute kitten appears, download the image.
Step 3: Make It Talk
Go to Tools > Avatar Creator. Upload your kitten portrait. Now type what you want the kitten to say in a cute baby-like style:
“Oh hewwo! I woke up and I want bweakfast! Where is my food hooman? I’m so hungwy! Give me tweats pwease!”
Baby voice tips: Replace “r” and “l” sounds with “w” (hello = hewwo, breakfast = bweakfast). Use short sentences. Add cute expressions like “oh no!”, “yay!”, “pwease!”
Step 4: Choose the Right Voice
Select a higher-pitched, softer voice for the baby kitten effect. The “shimmer” or “nova” voices work well for cute, youthful tones. Click “Create Avatar”.
Step 5: Download and Share
Your talking kitten video will be ready in about 30-60 seconds. Download it and post to your social channels. These videos consistently get high engagement on TikTok, Instagram Reels, and Facebook!
Pro Tip: Create a series with the same kitten character – give it a name and personality. Audiences love following recurring characters. Try themes like “Kitten’s first day at work”, “Kitten tries cooking”, or “Kitten gives life advice”.
Want more tutorials?
Ask the AI Chat Assistant for custom step-by-step guides for any creative project. Just describe what you want to create and it will walk you through the process using WavesAI Studio tools.
WavesAI Studio – Complete Feature Guide
Built with care in the UK. Powered by the world’s best AI models.
How to Create a HeyGen Avatar Video
HeyGen Avatars create premium AI video presenters with natural lip sync, gestures, and movements. Choose from professional avatars for business-quality video content.
Select HeyGen Avatar Mode
- ▶ Open the Avatar Creator from your dashboard
- ▶ Click the “HeyGen Avatar” tab (middle button between Static and Talking)
- ▶ The HeyGen interface will appear with avatar and voice options
Choose Your Avatar
Pick from 4 professional avatars:
Click on the avatar card to select it (it will highlight with a green border)
Select a Voice
Choose from 3 natural-sounding voices:
Click on the voice card to select it
Write Your Script
Type your script in the text area (up to 3000 characters)
- ● Use natural, conversational language
- ● Add pauses with commas and periods
- ● Keep sentences clear and concise
- ● Aim for 100-200 words for 1-2 minute videos
Generate & Download
- ▶ Click “Generate HeyGen Video”
- ▶ The video takes 2-5 minutes to process
- ▶ A progress indicator shows while processing
- ▶ Once complete, preview the video directly on the page
- ▶ Click “Download Video” to save the HD 1280x720 MP4 file
- ▶ Cost: 15 credits per video
How We Created the Brandon Academy Videos
This is how the Brandon tutor videos for WavesAI Academy were generated:
Each lesson module was scripted with clear, educational content covering AI business topics.
Brandon (Brandon_Business_Standing_Front_public) - Professional business male in standing position.
Confident Connor (voice ID: f0e85b...57b) - Clear, professional delivery.
Each script was sent to HeyGen API v2, generating HD 1280x720 videos with natural lip sync.
Videos embedded into WavesAI Academy (wavesaiacademy.com) using Tutor LMS.
52 lessons across 8 modules, all featuring Brandon as the AI tutor.
Tips for Creating Your Own Course Videos
- ● Write scripts of 200-400 words per lesson (1-3 minute videos)
- ● Use Brandon for consistency across a course series
- ● Add natural pauses with punctuation for better delivery
- ● Review and download each video before moving to the next
- ● Consider using the same voice throughout a course for continuity